Quantification and path tracking of small organisms are possible using the “tracking mode” in your WMicrotracker SMART.
In this mode, the system captures infrared images (1 per second) and automatically processes them to locate every organism/particle, calculating their trajectory and speed.
For the detection of adult C. elegans, the petri dish containing NGM culture must be placed face down (with the lid down and the appropriate plate adapter). This positioning preference is because the system utilizes the optical property of light phase transition (air-worm-agar) to magnify C. elegans silhouettes when exposed to infrared light.
If you want to track small aquatic animals and insects larger than 1mm in size, the petri dish must be placed face up, with the lid up and the appropriate plate adapter.
Step by step
- Open the “WMicroSmart” software The application should start immediately and display the “Start Window”.

2. Click on “Start New Acquisition” to connect to your SMART device. Be sure your device has been turned on and your computer is connected to phylumtech.com network. Enter the Device ID with the IP indicated on the device display and click on “Connect”

3. Set up the mode of the acquisition
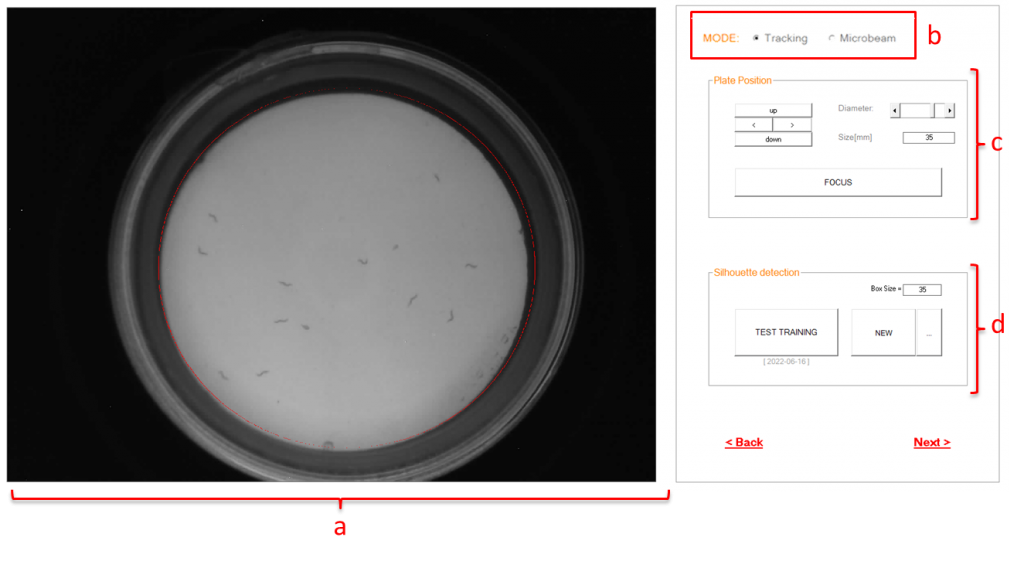
- Choose the MODE Menu “Tracking”

On the left you can see the plate layout. The picture displayed is a photo of the plate taken during the last connection with the device. You can view the plate in real-time while adjusting the focus of the device.
- FOCUS ADJUSTMENT AND BACKLIGHT
Into the setup windows you will have the possibility to adjust the focus, plate internal diameter and the light. (link al post – esta para cargar)
- Training the detection algorithm
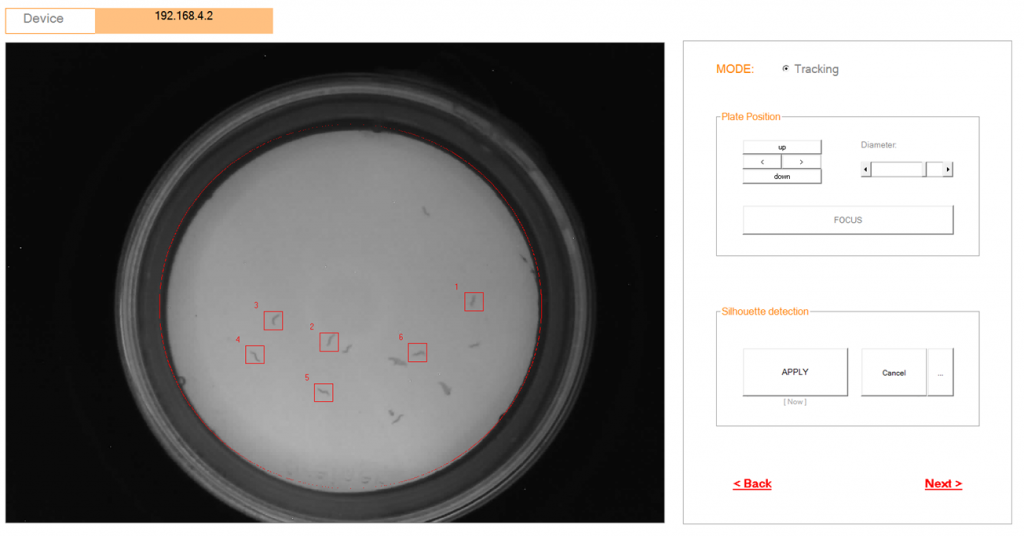
i. “New” button: Allows the software to be trained to recognize silhouettes .To select silhouettes of organisms in the image, click on the particle with the left mouse button (select 5 to 10 representative organisms). For example;

Then,
press the “APPLY” button, and the shadows of the animals will
turn red.

Finally, press “OK” to save the training parameters
Box size: Increase or decrease the box size so that the entire microorganism fits inside. The reference box size for C. elegans is 35 to 45 pixels depending on the size of the animals you are measuring.
ii. “Test training” Allows you to check the performance of recorded silhouette recognition patterns.

NOTES ON TRAINING AND FOCUS:
Training and focus need to be set for your first experiment, and the software will save the configuration for future experiments. As long as you use the same type of plates (agar preparation and worm stage), theoretically, you don’t need to retrain unless you observe that the software is recognizing fewer particles than expected or your image is out of focus.
To ensure the homogeneity of your plates, check these recommendations:
4. Set up the parameters of the acquisition

a. Project folder Menu:
i. You can create and name a new project folder by typing in the box.
ii. You can access a previous project name by displaying the box.
The project folder will be saved inside your software installation folder.
b. Data Acquisition:
i. “Read”: use this button to set the acquisition lapse time between 1 and 5 minutes.

For long assays, you can set cycles of acquisitions [More information here]
c. “Light Stimulus”:
You can choose to provide a 10-second blue light prestimulus before each plate acquisition or to acquire data in the presence of blue light. If you select the latter option, the blue light will turn on when the acquisition starts and turn off automatically when it stops.

NOTE: Not all the devices have blue light incorporated.
5. START
Once you have configured the acquisition settings, click on the START button to initiate the acquisition process. A pop-up window will appear, prompting you to enter a name for your experiment. It is recommended to choose a name that will help you identify your data in the future, as this name will be used for acquisition labeling.
During the acquisition, the software will display the progression of the results and real-time images. All the information, images, and reports will be saved for future access and reanalysis in the installation folder.
After completing the acquisition, a report file will be generated. For more details about the report, check this post: (https://www.phylumtech.com/home/en/tracking-mode-report/).
